Sunday, January 27, 2013

The 4th Flopsey Class card

Here is the 4th card we will be making in my Flopsey Cards class on Saturday 2/9/13 from 12 - 3 pm.  This class is going to be a lot of fun with plenty of Copic coloring.  You will need sharp scissors, but don't be intimidated, most of the Flopsey's will already be cut out for you!

Here is the list of Copics we will be using - please bring your own markers if you have them:

E31
E33
E35
E37
E57
E81
YR04
G000
G43
RV00
RV02
RV55
W1
BG000
BG53
R29
R83
YG13


I look forward to seeing you soon!
Cindy


Friday, January 18, 2013

Check Out Lisa Hetrick's New Facebook Page

Hi Everyone,

We have had a lot of new customers lately and I wanted to let you know about our wonderful Copic instructor, Lisa Hetrick.   Lisa is a true artist and designs all the stamps for one our favorite stamp companies, Avocado Arts. It had been a dream of Lisa's to launch a clear stamp company with a bit of a different vision: stamping is for everyone! She is an illustrator who stamps (and I think that's important), so she has a vision to create coordinating images that have endless possibilities. 

Lisa Hetrick is a full-service graphic designer and illustrator who has actively worked within many industries for 20+ years. Her career has lead her down many design paths holding designer, art director, design director, and creative director roles within the advertising, education, health care and papercrafting/art industries. She launched Lisa Hetrick Design in August 2003. 


Lisa Hetrick is taking advantage of the new year to revamp her website.  She has uploaded all her Copic Class Downloads for your convenience.  These have the marker colors suggested for each class.  Click Here.

Click Here for Lisa Hetrick Design Facebook Page

Wednesday, January 16, 2013

Dare to Share from Alice I.

Hi Everyone,

When we come up with the idea for the Dare to Share, we just never know what sort of projects your creative minds will come up with. Many of you know Alice from making her great cards on Demo Day.  Alice went way out of the box with this puzzle piece inspiration.  Her project has so many techniques that I know I will miss listing some of them.


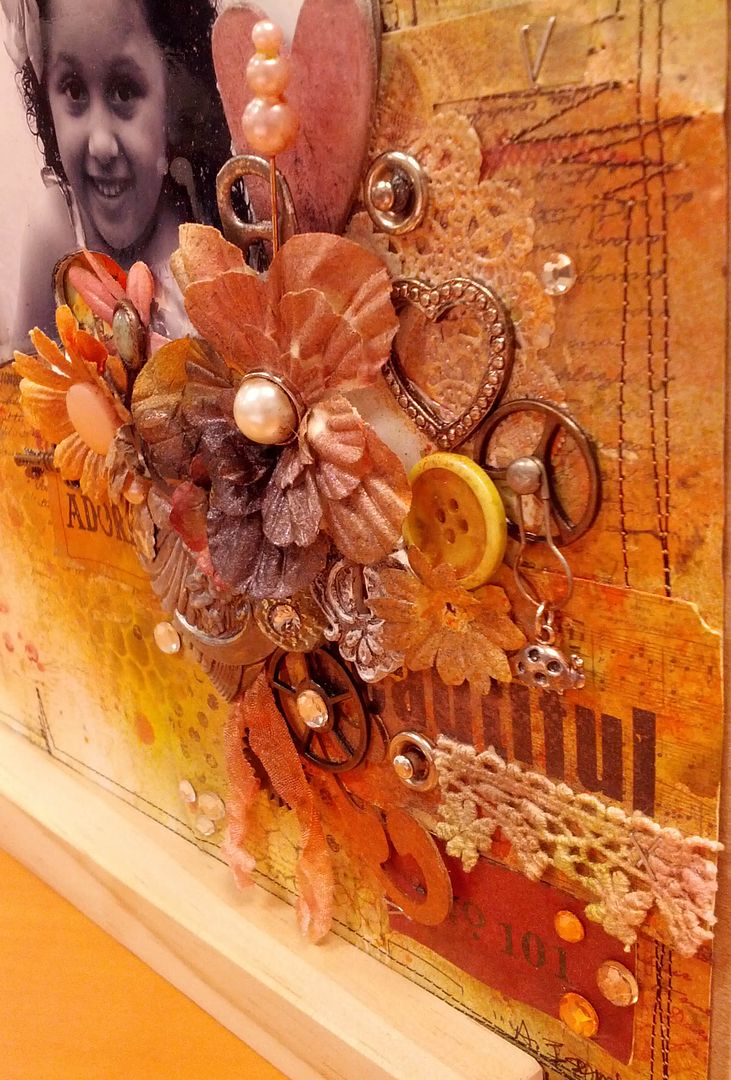
Alice took a patterned paper and added a few different colors of spray over a couple of different stencils.  She also stamped some subtle images on the background paper.   My favorite details on the paper were her use of a paper towel roll as a stamp to get the paint circle rings and her sewn paper edges.  


Alice combined all sorts of different elements to create this collage of texture and color.  Notice the snap and the tab from a soda can.  She used different shades of Tattered Angels spray on her flowers to get that rich color with a great shimmer.  

Alice combined Tim Holtz tags with the spray inks.  Attached the lace ribbon with the Tiny Attacher.  She also got nice color on the doily and it adds some shape and texture to the base.  I love how she combined so many objects like buttons, bling, paper clips, charms, chipboard, lace pins, brads and everything else she had on hand.

When you are in the store be sure to see this layout in person.  Also, let us know if you would be interested in taking a class to make a similar layout.   I think I may be able to twist her arm a bit to teach this class.

Thursday, January 10, 2013

Kaisercraft Pickled Pear Cigar Box

This Christmas I transferred my childhood Super 8mm home movies to dvd for my two sisters. It was an emotional project as my parents have been gone for a very long time. To say I was excited is an understatment!  As the holiday drew nearer I decided I wanted a special presentation for the gift so I stepped out of my "box" to alter cigar boxes.

I chose Kaisercraft's Pickled Pear collection because its soft shade of blue was my mother's favorite color and the vintage icons were images that suited the nature of my project.  To diffuse the yellow-ish green in the paper (just didn't love that color in this particular project) I used Stampendous Embossing Enamel in Shabby White and Frantage Mica that I melted onto the paper with a heat gun.  Using Mod Podge I decoupaged the paper to the box - even covering the insides. Next I added a lace trim to the lid's edge.  Then the fun really began!  I cut out a vintage camera and clock face from the paper to decorate the lid; applying Glossy Accents to the clock face to create a slick-looking finish.  Flowers from Petaloo and a paper doily also served as accents.  For the title I printed "Gundersdorff Family Movies" on printer paper so I could mark where it printed.  Then taking the actual Pickled Pear decorative paper I used a removable adhesive to line it up over the printer paper then re-ran it through the printer. Next I adhered it to a chipboard bracket shape from my stash and filed the edges to a smooth finish.

For the inside of the lid I layered several old family photos with more Pickled Pear journal cards cut from one of the papers, more flowers, leftover lace trim, and pearls.  The inside bottom of the box was only layered with a few journal cards to keep the base flat for housing the dvds.

 Christmas night is an evening I think we will all remember.  My sisters and I all cried and hugged while our children and husbands looked on.  Then we enjoyed viewing some of the movies together reliving the love and happiness of our childhood.


Friday, January 4, 2013

Customer Share from Mara Adkins

Hi Everyone,

We have a great customer share from Mara Adkins.  She bought this kit online and had a fun time putting it together.   This Graphic 45 Place in Time line is so versatile.  I love how it looks so different in every project I see.  Mara's project is a clear plastic base filled with 12 pockets and tags.  She can add photos on all the tags to finish it off.