Friday, December 30, 2011

January's Demo Day card

Wow, only one more day left of 2011!  It is hard to believe that another 365 days has flown by so quickly, but I am looking forward to 2012 and all that it will bring. 

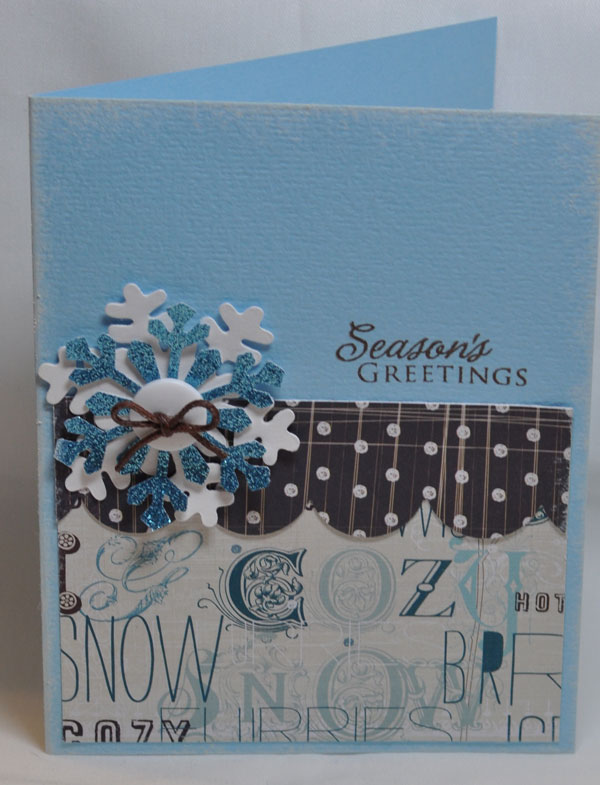
The first Demo Day of 2012 will be happening on Saturday, January 14th from 11 - 4 pm.  As always, we will have fantastic projects for you to create and we will help guide you through them.  My card will use a stamp from MFT (My Favorite Things) though I will also bring along some basic sentiments that could be used instead, and a gorgeous paper from Basic Grey's Little Black Dress line (which I think Gina A gave a shout out about in another post) - this paper line is stunning!

One of my objectives when creating cards is to use layouts that can be used over and over again for many different occasions.  The card I've created for Demo Day is one of those kinds of cards. 

On a personal note, I just want to say a huge thank you to everyone that I have gotten to know over the past few years of working and teaching at Photo Scraps.  So many of you have become friends and I feel so blessed to be able to share doing something that I love with so many people.  You have inspired and encouraged me, and I hope that I have given that back to you.  I look forward to seeing you throughout 2012.

Best wishes for a Happy New Year!
Cindy

Tuesday, December 27, 2011

Holiday greetings from Gina A!

Hope all of you are enjoying a wonderful holiday season!

I didn't have much time for blogging in these last weeks leading up to Christmas because I was busy CREATING! Stop in the store soon to see the sample treat bag and luminaria jar (in the mason jar) that I gave as gifts this year. Tracy is also posting a photo here of the frame I decoupaged for my daughter. I used one of our TPC Studio chipboard frames and altered it with black and white papers from my stash and the new Basic Grey "Little Black Dress" line (if you haven't seen this yet we have a beautiful selection in the store!) After the modge-podge dried I added a finish of Glossy Accents and I love the result! This is a good example of an idea you could "scraplift" for yourself or your gift-giving occasions in the new year.

And speaking of new years... I wish each of you a happy, healthy and successful 2012! It has been my pleasure to meet and get to know so many of you during my shifts in the store, as students in my classes, and/or as fellow crafters at the many Photoscraps Crops throughout the past year. I hope to see all of you often in 2012!

Happy new year!
Gina A.

Thursday, December 22, 2011

NEW CLASS: Flopsey Cards


Join me Saturday January 7th from 12 - 3 pm for my first class of 2012!  We will be making 5 cards using the absolutely adorable Flopsey stamps from My Favorite Things.  Flopsey is the cutest bunny stamp out there and is my personal favorite design of all the lines created by MFT.  We will be doing lots of Copic coloring and some detail cutting so make sure to bring your sharp scissors along.  Several cards use Glossy Accents (aka Diamond Glaze) as well, so if you own that product please bring it along too.

If you have your own Copics, please bring them with you.  Here is a list of colors we will be using:

N0
B02, B05, B21, B91
YG23
W1
R27, R83
BG10, BG15
C1
YR04, YR18
E23, E29, E31, E33
RV34

This class will be available as a kit if you are unable to attend in person.  Please let the store know you will need a kit when you call to register for the class.

I wish each and every one of you a Happy New Year.  I look forward to seeing you soon!
Cindy

Friday, December 16, 2011

Where has the time gone?

Wow, only a week until Christmas!  Where has the time gone?  It seems as if November and most of December have just disappeared in a flash.  It hit me today that I had completely forgotten to post some of the Design Team cards I made using the fabulous Winter Twig from Little Yellow Bicycle.  This paper line is just terrific, from it's patterns and colors to it's slight texturing on the papers.

One of my cards I was happy with, the other did not turn out the way I had pictured it but I wanted to show it to you anyway.  We all have those projects that we are not quite thrilled with once completed, but don't dislike them enough to throw them away.  Believe me, I've had my share of throw-aways...if you could only see the trashcan under my desk right now. Can you guess which card I was not quite happy with?

My first card uses the front and back side of one piece of paper.  I added the sentiment (Hero Arts) in brown, edged the entire card with white Staz-On to give it a snowy look (ruined my pad...here's a tip...don't ink edges directly with the white Staz On ink pad...use a dauber), and finished it with a snowflake cut from wool-blend felt and a Spellbinders die and another snowflake cut from Best Creations glitter paper (gorgeous!) then a ribbon and some twine colored with a Copic marker to finish it off.  One of the great things about Copics is that you can custom color your embellishments to match your projects.


My second card uses the beautiful bird stamp from Hero Arts and wood grain paper from Winter Twig.  I turned the patterned paper so that it was running horizontally.  The stamp was heat embossed with Stampendous white embossing powder (my favorite white EP), then stamped the sentiment in Faded Jeans Distress ink and popped it up on a little flag.  Some bling finishes off the card.


If I don't see you before the holidays, I wish all of you a Merry Christmas, a Happy Hanukkah, and a Happy Everything that you may celebrate at this time of year! 

Cindy

Friday, December 9, 2011

winter twig

If you are like me, you may not be ready for snow yet, but just like Christmas, it will be here before you know it! And if you are like me, you already have snow pictures from our freak storm on October 29th! So it is a good thing we have already got a new winter line from LYB called winter twig. I used 3 different paper prints and a variety of embelishments from this line to make my 2 page spread. I also used color box ink in blue lagoon (my fav.) to distress edges of white cardstock to make them pop off the page. While getting design inspiration from a magazine, I read an article about "clustering". You may already do this and not know there was a term for your design! It consists of grouping things (like photos, words, or embelishments) together on your page by layering to add balance to a title or ground a journal spot, or even draw the eyes to your photos. I like it because it allows you to use many embelishments together without looking junky! So I went nuts with chip elements, transparancies, cardstock stickers, chip titles, and label stickers! They also have borders and cool snow flakes to add to your projects, even some embelishments with glitter for those of us who like some sparkle! I played with my large variety of embelishments until I got it clustered enough for my eyes to enjoy without being overpowered by stuff on my pages. Remember, there is no wrong way in scrapbooking, only how your eyes like to see things! So try something new, like clustering, I am going to try clustering something else next month!